QED + QEX Manual (V2.90)
QED and QEX step by step
Table of Contents
. . . . . Overview of Functions . . . . . Contact
. . . . . QEX2 - Enhanced
Document Converter
New in this Manual:
- new menu structure
- write
protected/editable documents
- block insert
- custom fonts
- special versions for Sony Clié and Handera
devices
- font replacement example for Sony Clié
- expand the clipboard
with MultiClipHack
- access documents stored on SD Card or Memory Stick
- launch applications and documents with Launcher
III
What
is QED
QED is a comfortable,
experienced and stable text editor for all Palm models from Handera
- Handspring - Palm
- Sony
- Treo.
Premise for the correct function is at least Operating System (OS) Version 2.0.
Because QED manages the devices' memory very economical, it works reliable and
fast even with older and simpler Palm models. QED allows reading and editing
already existing documents and is able to generate new ones, manages document
categories and bookmarks and gives the ability to show documents in different
styles. As a special feature QED has a virtual widescreen, texts especially
tables and sourcecode can be wider than the display and are moved horizontally.
Most of a documents Preferences are stored automatically
with it, if you switch between different documents you will find each as you
left it. QED is Shareware, unregistered a registration requester pops up from
time to time when writing text. Used only as 'Reader' no registration requester
will pop up. Look at QED to learn how to use QED.
What
is QEX and QEX2
QEX is an easy to use Windows program to convert text documents
between PC and PalmPilot format (both directions). The program supports Windows
95, 98, NT and 2000. Registered users of QED can use their registration key
for QEX as well, unregistered QEX is fully functionable but registration
requesters will appear when starting it. Read how to transfer documents to/from
your Palm device in Chapter QEX.
Informations on QEX2 an enhanced document converter you can get here -> QEX2.
Preparation
Before you can install QED, QEX or Palm documents make sure that:
Download
QED (zip) . . . . . Download
QED (sit)
Register QED at PalmGear.com . . . . . Information
for Registering
QEX2
- New Document Converter
Download QEX - Document Converter
QED
FAQ Page English . . . . . Spanish
. . . . . Japanese
This
Manual in German
Look here for WinZip for
Windows and ZipIt or
StuffIt for
Mac users
Look here for documents
QED
Support
Documents
In order to load documents on your Palm device and read or work
on them with QED or an other program, it is helpful to know a little about the
used text formats. That includes the reverse way, if you made a new document
or edited an existing one on your Palm device and want to transfer it to your
PC. Text documents on your Palm device (on your PC recognizable on the .pdb
extension) contain only plain text and paragraph information
without consideration of the typeface, typesize or underlining, and are mostly
compressed. This format is often described as DOC.
On your PC text documents exist in the simplest case as ASCII files, recognizable
on the .txt
extension, they also contain only the plain
text and paragraph information, however they are always uncompressed.
From PC to Palm device:
From Palm device to PC:
Read in chapter QEX how to transfer documents from/to your Palm device and in chapter QED how to work with QED.
Compressed
and uncompressed documents
Here are listed some advantages and disadvantages using compressed and uncompressed
documents on your Palm device. Compressed documents have a low consumption of
memory and can be decompressed without noticeable loss of time, they are ideal
for 'read only' purposes. Editing a compressed document requires recompressing
it from time to time and this is a time consuming process, because 'compressing'
a document is a more demanding job than 'decompressing' it. Particularly if
you are changing text on different places of a document, or you are using the
Search/Replace function, it is worth working with
uncompressed documents. From the beginning you can work with documents generated
uncompressed, or you can save an existing compressed document as uncompressed
and continue working with it. After all changes has been done in the text you
can finally save the document compressed again. For compressing and uncompressing
documents use the QED menu - 'Menu/File/Save As'.
For generating new compressed or uncompressed documents use the New
Document function.
Install QED
After downloading QED unpack it to an empty directory on your
PC, you should find the following files in there.
| Archive content:
|
Note:
|
Double click on one of the .prc or .pdb files, if your Palm Desktop is installed properly QED or a choosen font will be noted for installation on your Palm device. Now do a Hotsync, and if your Hotsync application is active, QED and fonts are transferred to your Palm device, in case of more files has to be transferred and synchronized, it can last up to several minutes. Transference of QED only is finished in a few seconds. Installation of a new QED version over an old one without deinstalling QED in front is possible without problems.
![]() After Hotsync has finished you can start QED on your Palm device at once by
tapping on its symbol.
After Hotsync has finished you can start QED on your Palm device at once by
tapping on its symbol.
Start
QED for the first time
If you are starting QED for the first time and you have already installed
documents on your Palm device, QED welcomes you with its 'Open'
Dialog. Only a brief description here: Tap on a documets name first
and then on the checkmark on bottom right in this dialog, a doubletap on the
documents name does the same - the documents is beeing opened. If you still
have loaded no documents to your Palm device (the dialogs document list is
empty)
or do not want to open one now, tap on the cross on the bottom right to leave
the 'Open' dialog. You can now generate a New
Document
or again load an existing one or leave QED.
Register
QED
QED is shareware, unregistered a register requester will pop up sometimes
when writing text. Used as 'Reader' only this request will not appear. You can
register QED at PalmGear.com,
please read also the Information for Registering.
Symbolbar
QED's symbolbar is used for quick and direct command execution, alternatively
you can execute commands by means of Menu Calls. The
symbolbar is also used to Navigate through a documents
text. To show one or two additional lines of text on the display, you can turn
off the symbolbar by using the 'Menu/Options/Toggle Bar'
command.
 |
1.
New Document
|
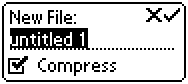 |
1. Enter the name of the new document
2. Tap on the checkmark on the upper left to confirm
For creating documents with tables or sourcecode, read paragraph Tables and Sourcecode, also read about Preferences. |
![]() 'Open' Dialog
'Open' Dialog
QED's 'Open'
dialog is not designed for opening documents only, it also lets Rename,
Delete and Categorize
them. As well the categories themselves are managed here. If you like to open
a document that contains tables or sourcecode, read paragraph Tables
and Sourcecode, also read about Preferences.
Open Document (simplest way)
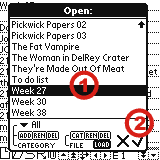 |
1. Tap on the desired documents name
2. Tap on the checkmark to confirm Tip: If you are writing or typing (keyboard) a letter in Open Dialog, selection is set to the first document with this initial letter directly. Note: If you Replace the Fonts Standard and HrStandard the Open Dialog filelist will possibly show more entries. |
Open Document (general)
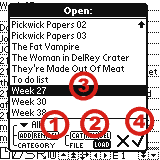 |
1. Choose a document category ('CATEGORY')
2. Set the 'FILE' buttons to 'LOAD' 3. Tap on the desired documents name
4. Tap on the checkmark to confirm
Tip: If you are writing or typing (keyboard) a letter in Open Dialog, selection is set to the first document with this initial letter directly. Note: If you Replace the Fonts Standard and HrStandard the Open Dialog filelist will possibly show more entries. |
Rename Document (FILE - REName)
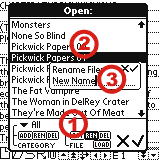 |
1. Set the 'FILE' buttons to 'REN' 2. Tap on the desired document
3. Enter the new name for the document
QED offers two further possibilities to rename a document: Renaming by Menu and renaming in Preferences dialog. |
Delete Document (FILE - DELete)
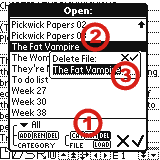 |
1. Set the 'FILE' buttons to 'DEL' 2. Tap on the desired document
3. Confirm deletion
You can also delete a document by menu command: Delete Document by Menu. |
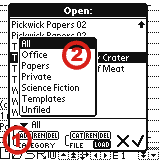
Categorize Document (FILE - CATegorize)
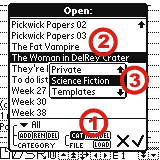 |
1. Set the 'FILE' buttons to 'CAT'
2. Tap on the desired document
3. Choose the desired category for the document
|
 |
1. Tap on the small triangle above the 'CATEGORY' buttons
2. Tap on the desired category
|
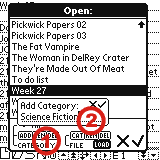 |
1. Tap on 'ADD' of the 'CATEGORY' buttons
2. Enter the name of the new category
Read also Notes to Categories in chapter Choose a Category |
Rename Category (CATEGORY - REName)
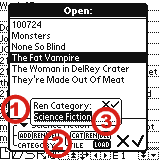 |
1. Choose the category to be renamed
2. Tap on 'REN' of the 'CATEGORY' buttons
2. Enter the new name for the category
Read also Notes to Categories in paragraph Choose a Category. |
Delete Category (CATEGORY - DELete)
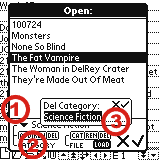 |
1. Choose the category to be deleted
2. Tap on 'DEL' of the 'CATEGORY' buttons
3. Confirm the deletion
Read also Notes to Categories in paragraph Choose a Category. |
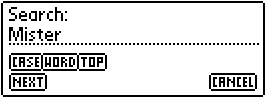 |
1. Enter the searchtext below 'Search'
2. Tap on 'NEXT' to start the search (again)
Tip: The settings of 'CASE' und 'WORD' are also valid for Global Search. |
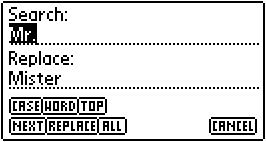 |
1. Enter the searchtext below 'Search'
2.
Enter the replacetext below 'Replace'
3. Tap on 'NEXT' to start the search (again)
|
![]() Bookmarks (call and manage)
Bookmarks (call and manage)
The bookmark dialog allows to perform all important bookmark operations
central and clearly from one place. A bookmark stores the recent reading respectively
writing position together with a choosable name. The number of bookmarks for
a document is not restricted, bookmarks are stored unvisible at the end of a
document. Also read the paragraphs about Text
based Bookmarks and Automatic Bookmarks and Tips
to Bookmarks.
 |
Call Bookmark
Add Bookmark
Rename Bookmark
Delete Bookmark (1 Bookmark)
Change Bookmark Order
Sort Bookmarks
Note: If you Replace the Fonts Standard and HrStandard the Bookmark list will possibly show more entries. |
Text
based Bookmarks
If your document
is using headlines with a little trick you can make them to bookmarks in one
go, without the need of leafing the whole document and entering every bookmark
manually. As a pre-condition all your headlines must start with the same text,
for example 'Chapter' followed by the actually headline. Usually a small circle
character ° is used in Palm documents in front of headlines (instead of
for example 'Chapter'). Example:
Automatically
generated Bookmarks
If there is a
text in between pointed brackets at the end of the document, the document will
be searched automatically for this text and the found lines are added to your
bookmark list. Example:
Tips
to Bookmarks
Bookmarks in Palm documents are managed only static, this means if you change
text on a certain part of your document the position of all following bookmarks
will change. To catch this disadvantage you can help yourself with Text
based Bookmarks.
![]() ...
... ![]() ... Document Editable
... Document Editable
If a document is not write protected this button switches between
Displaynavigation and text edit mode. Read more about
at Write Protected/Editable Documents.
Tip: Set the editable
button to ![]() and move comfortable
through the text by Displaynavigation, if you have
found the place you want to change tap the editable button again to continue
editing.
and move comfortable
through the text by Displaynavigation, if you have
found the place you want to change tap the editable button again to continue
editing.
![]() ...
... ![]() ...
... ![]() ...
... ![]() ... Switch Document
... Switch Document
This button allows to switch between two documents or two views of
one document comfortably. For switching to and back you can tap on the numbers
1 or 2 or call 'Menu/File/Switch'.
By use of 'Menu/Options/Twin View' you toggle between two-document-mode
and two-views-mode. In two-views-mode the numbers 1 or
2 are marked with a little T for 'Twin View'.
in two-document-mode:
in two-views-mode:
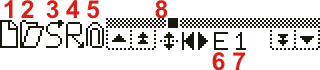
The
Navigationbar
The
Navigationbar is a part of the Symbolbar and is
for comfortably moving through the text. If you only want to read your document
there is an additional method of navigating, read about
it in chapter Displaynavigation.
You can also use the
hardware buttons of your device to navigate through
the document.
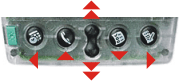
|
1. Scrollbar
2. Button Up
3. Button Down
4. Buttons Home/Right
5. Scroll direction button
Here you find the description of the whole Symbolbar. |
Displaynavigation
If you only want
to read your document without editing it, you cannot just move with the Navigationbar
or the hardware Up/Down buttons through the text. If documents are 'Read Only',
the displyed text can simply be draged with the pen. Read here how to Write
Protect (make read only) your document. You can also use the hardware
buttons of your device to navigate through the document.
 |
Draging the Display
with the Pen
Tip: Use the
You can also use the hardware buttons of your device to navigate through the document. |
 |
Tap on the desired
sector
Tip: Use the
You can also use the hardware buttons of your device to navigate through the document. |
Navigation
with Hardware Buttons
While QED is active
you can use your devices application start buttons to navigate through the document.
Here you'll find the description of the Navigationbar,
you can also move through the text by using Displaynavigation.
 |
Press the desired button
Activate/deactivate the Hardware Buttons Navigation with Preferences (Default Prefs - Hardbuttons). |
Edit
Documents
To edit a document it may not be write protected, read
the chapter Write Protect Documents
in this context. Also read the chapters Symbolbar
and QED Menus as well as Preferences.
How to edit documents containing tables and sourcecode you can read in chapter
Tables and Sourcecode.
 |
Write
Mark Text
Operations on marked Text...
Insert text from the Clipboard
Doubletap Copy/Insert
Undo the last Action
|
The
Clipboard
The clipboard is a small memory to copy text into and out of it from/into
your document. Every time a text is copied to the clipboard the old one in it
is written over, when inserting text from the clipboard its content stays unchanged.
The clibboard contains 1024 characters by default only, if this is not enough
it can be expanded essentially with ClipHack
or MulitClipHack.
MultiClipHack
even allows the concise managaging of multiple independant clipboards. The following
describes how to use MultiClipHack:
Usage of MultiClipHack
Menushortcuts
Menu commands
can be called not only with your Palm devices menu button field, you can also
use menushortcuts for direct access. Simply write the 'Menu Command' (look
at
Graffiti Help) followed by the shortcut letter
of the desired menu. You find this letters to the right of the menu points.
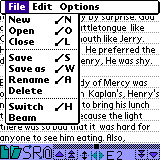 |
File Menu
|
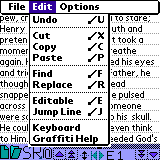 |
Edit Menu
|
|
|
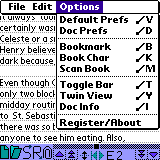
Options Menu
|
Save
Document
Documents are saved automatically when writing text, when creating or closing
a document and also when leaving QED. With this command you can save your document
manually at any time.
Save
Document with different Name/Format
Use this function to save your document under a different name or format. You
will get additional security for your data, because your document ist stored
as a copy under a different name. This makes possible to access documents in
different stadiums of their origin. As well you can change the format of Compressed
and Uncompressed Documents with this function.
Rename
Document (by Menu)
QED offers two further possibilities to rename a document: Rename
in Open Dialog and Rename in Preferences Dialog.
Delete
Document (by Menu)
This function deletes the current loaded document after a query. You will find
how to delete documents without loading them in chapter: Delete
Documents with Open Dialog.
Beam
Document
If your Palm device is equiped with an infrared port, the currently loaded document
is sent to a second Palm device in reach.
Close
Document
This function saves and closes the loaded document. An empty screen is shown
after this action. Saving and closing is done automatically when leaving QED.
Display
Informations on the Document
This function shows several informations on the loaded document. For big documents
this may last a little, because the number of words in the document is recorded
too.
Jump
to Line
With the 'Jump Line' function you can go direct to a particular line
number of a document. This function is especially helpful when developing software,
if the compiler referes to a erroneous line in the sourcecode.
Information
for Registering
(credit card payment at PalmGear.com)
You can also pay direct in Euro-Zone
 In
case you are not a registered user of QED and calling 'Menu/Options/Register',
the ownername of your Palm device is shown, that you have to know when registering.
The ownername is set in the Palm Desktop application of your PC and transferred
to your Palm device when a hotsync is performed.
In
case you are not a registered user of QED and calling 'Menu/Options/Register',
the ownername of your Palm device is shown, that you have to know when registering.
The ownername is set in the Palm Desktop application of your PC and transferred
to your Palm device when a hotsync is performed.
(The ownername is often described as 'HotSyncID' too)
After a successful registration a call of 'Menu/Options/Register', shows your devices ownername and your registration code.
Registration
in Euro-Zone (direct payment with )
You can also pay by Credit Card
In
case you are not a registered user of QED and calling 'Menu/Options/Register',
the ownername of your Palm device is shown, that you have to know when registering.
The ownername is set in the Palm Desktop application of your PC and transferred
to your Palm device when a hotsync is performed.
(The ownername is often described as 'HotSyncID' too)
After a successful registration a call of 'Menu/Options/Register', shows your devices ownername and your registration code.
Preferences
There can be made
various settings referring documents or QED's mode of operation, in prinicpal
two kinds of preferences are to distinguishe. 'Default Prefs'
are
effective when a document is created or opened the first time. 'Doc
Prefs' are effective for the currently loaded document, this kind of
preferences can be suited for every document individually and is stored with
the document.
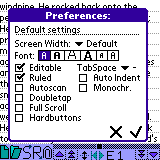 |
Default
Prefs
New done settings only get active after leaving the preferences dialog with the bottom right checkmark. For breaking the dialog without saving changes tap on the bottom right cross.
|
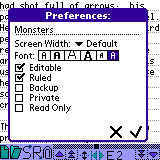 |
Doc
Prefs
New done settings only get active after leaving the preferences dialog with the bottom right checkmark. For breaking the dialog without saving changes tap on the bottom right cross. |
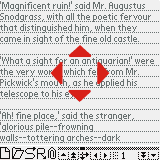
Screenwidth
Standard screenwidth of an ordinary Palm device is 160 pixel (more than 160
pixels at hires devices), QED allows to set this width virtual up to 1280 pixel.
As a result it is possible to edit Tables
and Sourcecode more comfortable. How to navigate through wide documents
you can read in the chapter about the Navigationbar.
Read how to change screenwidth in the Preferences
dialog. On devices with varying screenwidth like the Handera,
the 'Default' setting fits for landscape mode as well.
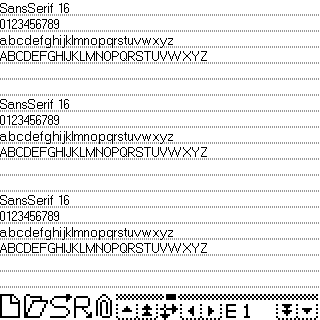
Fonts
You will find the fonts choice in the Preferences
dialog.
 |
The Fonts (from left to right)
Custom Fonts
Monospaced fonts (non proportional) have all characters the same width and are the best choice for displaying Tables and Sourcecode.
|
 |
Tip: Replacement
of Fonts
The example shows SansSerif 16 font on a Sony Cliè.
Note: If you replace the fonts Standard and HrStandard the Open Dialog and Bookmark list will possibly show more entries. |
Here
is a little example for replacing fonts on a Sony Clié
After this you have replaced two big unusual fonts with a 16 and 18 pixel
hires font, that are very good reading on your Sony Clié. Thus certainly
brings some more Text on your small palm screen. Screenshot
with SansSerif16 font.
Preparation
Hack configuration with X-Master (analog with HackMaster)
Replace Large font with SansSerif16(0) font
Replace HrLarge font with SansSerif(1) Font
Repeat the last two steps with LargeBold font
Great Finish
Note: If you replace the fonts Standard and HrStandard the Open Dialog and Bookmark list will possibly show more entries.
Tables
and Sourcecode
In order to depict table columns and sourcecode without shiftings you can
take the following steps:
Tip: Setting option
'Preferences - Auto Indent'
makes editing of tables and sourcecode more easy.
Tip: Choosing a suitable Font, especially
Hires Font might help getting more overview in your
document.
Write
Protected/Editable Documents
QED distinguishes
between zwo kinds of write protection, the real write protection and the editable
property of a document. In case of an active write protection you can switch
between Displaynavigation and text marking function
with the editable property, without changing the text accidentally. If the document
isn't wirte protected the editable property changes between Displaynavigation
and text edit mode.
Tip: If
you are loading texts like E-Books on your Palm device, that you will read only
and so don't wish to be changed, you can activate write protection for them.
Tip: Use the editable property with activated write protection
to switch between text marking mode and Displaynavigation.
Private
Documents
Private documents
will not be shown in QED's Open Dialog and so cannot
be loaded, they are protected from curious looks. In a first step mark your
currently loaded document private by setting 'Preferences
- Private'. The so marked documents will stay visible until you call in a second
step the application 'Security' of your Palm device and choose 'Private
Records' - 'Hide'.
Backup
at Hotsync
If this option
of the 'Preferences' dialog is set, the currently
loaded document will be saved to your PC at next hotsync, if the document was
changed. Read the chapter 'Documents - From Palm device
to PC' to find out in which directory of your PC the saved documents will be
stored.
Tabs
to Spaces (TabSpace)
If you write a tab character (ASCII 9) on your device the number of spaces that
is set here, is inserted into the text instead. A dash in this field means that
no replacement is done, tabs are inserted to your text as usual. Replacing tabs
with spaces makes editing of Tables and Sourcecode
more easy (tabs in PalmOS are not variable in width). This setting also affects
the Block Insert function.
Tipp: Read in paragraph Block Insert how to insert tabs into your text.
Auto
Indent
If this option as activated every new entered line (Return) is beeing indented
like the line before. This is especially helpful when editing tables and sourcecode,
because leading spaces and tabs have not to be typed in again.
Block
Insert
If you
are editing for example Tables and Sourcecode,
this function allows to indent marked passages of text.
Note: On marked text blocks that have been automatically wrapped, only the first word will be indented.
Enter Tabs and Cursor keystrokes like this:
| Tab | tap one
time (.) and draw |
| Cursor-Rigth | draw |
| Cursor-Left | draw |
Global
Searchfunction
The global
searchfunction serves as a quick textsearch in all documents of the current
set Document Category.
Globale Search uses the settings 'CASE' und 'WORD' of the Searchfunction.
Tip: Use the settings 'CASE' and 'WORD' of the Searchfunction to search word/case sensitive.
Keyboard-
and Pen-Shortcuts
Most of QED's
dialogs are controllable by keyboard- (if available) and pen-shortcuts as well.
In dialogs 'Menu/Edit/Cut-Copy-Paste' is available as well.
 |
QED's text entry dialog has four elements:
The text entry dialog is also controllable by Keyboard- and Pen-Shortcuts. |
Graffiti
Help
Normally you can call your Palm devices' graffiti list by drawing
a long stroke beginning from the text input field over the screen. If the graffiti
help will not appear you can do the following:
Tip: You can also open the graffiti help with 'Menu/Edit/Graffiti Help'. A printed version of the graffiti help was shipped with your Palm device.
Software
Keyboard
Start the software keyboard
by tapping the small 'abc' symbol in the bottom left corner of your Palm
devices' text input field. The software keyboard allows only editing a small
part of the document. After closing the software keyboard the edited text is
inserted into the document.
External
Memory
Up to now QED is tested with TRG memory products only. If QED cannot
read directly from your external memory you have to copy your document to your
Palm's internal memory manually. In chapter Co-Operation
with Launcher III you can read how to load documents diretly from external
memory media with help of Launcher
III. If you want to access SD Card or Memory Stick directly with QED you
should read chapter Co-Operation with MsMount.
Co-Operation
with Launcher III
Launcher
III offers a comfortable user interface with some extended functions for
PalmOS devices. So not only applications but also documents can be loaded by
a reader or editor directly, this even works with documents on external memory
media. Take the following steps to do so:
![]() All documents on your device are displayed with the Qed symbol now. Possibly
these big symbols are taking too much space, to use smaller symbols you can
observe the following tip.
All documents on your device are displayed with the Qed symbol now. Possibly
these big symbols are taking too much space, to use smaller symbols you can
observe the following tip.
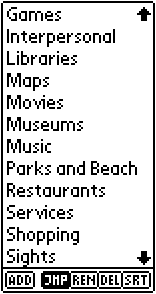
 |
Tip:
To gain more space on your Launcher
III display you can do this:
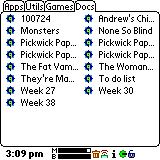
To the left is an
example how clearly Launcher
III can display your documents. |
Documents that reside on external memory media are provided with a small memory card symbol.
Has Launcher III or QED already been installed on your device, it may occur that not the symbols shown in this example are used, call Launcher III 'Menu/Options/Refresh Apps' to refresh the applications symbols.
Co-Operation
with MsMount (or PiDirect II)
MsMount
is a free available program that allows QED or any other application to access
SD Card oder Memory Stick directly. Documents to be accessed in this way must
reside in a certain directory on the external memory media. A similar but commercial
product with more far-reaching possibilities is PiDirect
II.
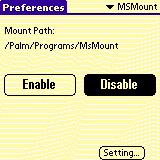 |
So you put MsMount into operation (similarly you do with PiDirect II):
Hints: |
Special
Versions
For Handera
and Sony
Clié there are special versions, that will only run on the accordant
devices, added to the QED Zip-Archive. These program versions
are, depeding on the device, capable of several additional options.
Handera
Sony Clié
Sony Clié with Soft Graffiti field
Overview of Functions (selection)
- compact, very fast and rock stable working program
- compatible with PalmOS® organizers version 3.0 and greater
- OS5 hires support
- very clear and intuitive to use
- nevertheless full featured practical oriented functions
- free usable as reader
- co-operation with QEX and QEX2 the DOC converter
- special versions for Handera and Sony Clié devices
- Treo keylist and option state support
- comprehensive manual in English and German, FAQ page in several languages
- competent and fast support at qed@qland.de
- BackupBuddy certified
- co-operation with Launcher III
- co-operation with MsMount and PiDirect II, -> more
.. access documents stored on SD Card and Memory Stick
- co-operation with patched OnBoardC
- prepared for co-operation with PocketC
..so even documents on external memory can be viewed and edited, -> more
- optional Virtual Wide Screen, texts especially Tables and Sourccode are displayed more clearly
- clear Open Dialog with lot of functions
- Category handling at the right place - in Open Dialog
- Compressed/Uncompressed Saving possible
- quickload function for two documents, -> more
- two views of the same document possible, -> more
- quick Bookmarkhandling, several kinds of sorting bookmarks
- support of Textbased and Automatic generated bookmarks
- Global Searchfunction (search in more than one document
.. works category/word/case sensitive (optional)
- Search- and Replacefunction with various options
- several global- as well as document related Preferences
- five system Fonts and two Custom Fonts
.. additional Fonts (even hires) with Fonthack 123
- quick Screennavigation in writeprotected mode
- all hard buttons usable for file navigation (optional)
- Wordcount Function for article writers
- quick copy and paste function by Doubletap (can be switched off)
- Private documents
- space-saving horizontal orientated Navigationbar, can be switched for horizontal scrolling
- quick Edit/Writeprotect Button
- Symbolbar (can be switched off) for quick function calls and navigation
- Beaming of documents via infrared
- keyboard support in all important dialogs
- cut-, copy- paste- function in dialogs
- jump to line function
- progressbar is shown when Compressing text
Lot of professional and
private QED users state:
'No other PalmOS
editor is faster, more stable and more practical oriented as QED.'
QEX
QEX is an easy to use Windows program to convert text
documents between PC and PalmPilot format (both directions). The program supports
Windows 95, 98, NT and 2000. Registered users of QED can use their registration
key for QEX as well, unregistered QEX is fully functionable but registration
requesters will appear when starting it. Read here how to transfer documents
to/from your Palm device.
Also see QEX2 - Enhanced Document Converter
Install
QEX
Execute qexsetup.exe on your PC and follow the instructions
of the installation program.
![]() Now you will find QEX in the drawer 'Start/Programs/Qex' of your windows start
menu.
Now you will find QEX in the drawer 'Start/Programs/Qex' of your windows start
menu.
Register QEX
In case you are a registered
user of QED you can also use your QED register code for QEX, unregistered QEX
is although fully functionable but shows a request to register in front of every
action. Here are
the links to register QED: Links for Registering.
Transferring
a Text Document from PC to Palm Device
It is assumed that your text document already exists in
ASCII format (on your PC) in a .txt
file. You can read how to convert MS-Word documents or
documents in other formats to ASCII format in chapter
Documents.
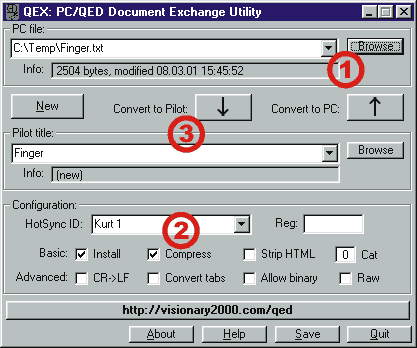 |
1. Locate the text document to be transferred (source) with help of the 'Browse' button
2. Choose options for the transfer
The further Options are explained here. 3. Start the conversion with 'Convert to Pilot' button and perform a hotsync
|
Transferring
a Text Document from Palm Device to PC
It is assumed that
you created a new document or edited an existing one on your Palm device and
already have performed a hotsync. More details to documents you will find in
chapter Documents.
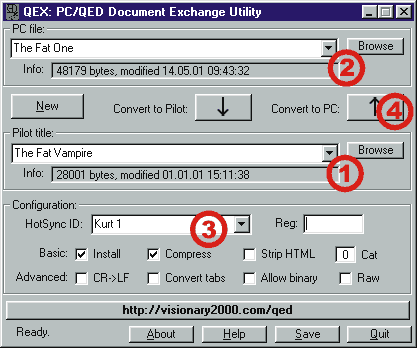 |
1.
Locate the text document to be transferred (source) with help of
the 'Browse' button
2. Choose path and name for the document to be transferred (destination) with help of the 'Browse' button
3. Choose options for the transfer
The further Options are explained here. 4. Start the conversion with 'Convert to PC' button
|
>
What is QED
>
What is QEX
> Preparation
>
Documents
- PC to Palm device
- Palm Device to PC
- Compressed and Uncompressed Documents
QED
> Install QED
> QED the first time
> Register QED
> The Symbolbar
> New Document
>
'Open' Dialog
+ Document
- Open
- Rename
- Delete
- Category
+ Category
- Choose
- Add
- Rename
- Delete
>
Search Function
> Replace Funktion
>
Bookmarks
- Text based
- Automatic
- Tips
> Document Editable
> Switch Document
> The Navigationbar
- Displaynavigation
- Button Navigation
> Edit Documents
> QED Menus
- Menushortcuts
+
File Menu
- Open
- New
- Save
- Save as
-
Editable
- Rename
- Delete
- Switch
- Close
- Info
+
Edit Menu
- Cut
-
Copy
- Paste
- Undo
- Find/Search
- Replace
- Jump Line
- Bookmark
- Scan Book
+ Options Menu
- Default Prefs
- Doc Prefs
- Book Char
- Toggle Bar
- Two-Views-Mode
- Register
- About
> Preferences
+
Default Prefs
- Screen
Width
- Font
- Editable
- Ruled
- Autoscan
- Doubletap
- Full scroll
- Hardbuttons
- TabSpace
- Auto Indent
+ Doc Prefs
- Rename
- Screen Width
- Font
- Editable
- Ruled
-
Backup
- Private
+ More to Preferences
-
Screen Width
- Fonts
- Tables and Sourcecode
-
Writeprotected/Editable
- Private Documents
- Backup at Hotsync
> Block Insert
> Global Searchfunction
> Keyboard- and Pen-Shortcuts
> Text Entry Dialog
> Graffiti Help
> Software Keyboard
>
Additional Memory
> QED + Launcher III
> QED + MsMount
> Font Replacement
> Expand Clipboard
> Special Versions
> Overview of Functions
QEX
> Install QEX
>
Register QEX
>
PC to Palm Device
> Palm DEvice to PC
> QEX Options
>
Buttons and Fields
qed+qex
.
support qed@qland.de
. home qland.de/qed
. faq qed
faq
author
. mail qrt@qland.de
. home qland.de
copyright
QRT 280904